Sign the Certificate Signing Request
Describes how to sign the generated CSR.
To sign the CSR:
-
Copy the contents of
client.csrstarting from-----BEGIN CERTIFICATE REQUEST-----to-----END CERTIFICATE REQUEST-----to the clipboard:more client.csr -----BEGIN CERTIFICATE REQUEST----- MIICszCCAZsCAQAwbjELMAkGA1UEBhMCVVMxEzARBgNVBAgMCkNhbGlmb3JuaWEx FDASBgNVBAcMC1NhbnRhIENsYXJhMQwwCgYDVQQKDANIUEUxDTALBgNVBAsMBE1h cFIxFzAVBgNVBAMMDnNhZmVuZXRjbGllbnQxMIIBIjANBgkqhkiG9w0BAQEFAAOC AQ8AMIIBCgKCAQEA1Umkhy1AOVEjl8pW6h4wSouv6azv9fzRJryPzVhEJ2OAEdjo INrtIltUOmIcTRTfmN3qdDuYUvy9lqouGDxYwFhjZvbGoS+YnYG8/OyFoZDYPPtq WcJ37Xcwj8aCrAwhtuy6KOcsQ/QYqqH3aH4M9mZzTOy1Auw7DULuTSe/YJR0gRNf vUThH5wzfmHmAoZfdxniviVWOcqSoC2VIUVC9XU103K7uo4zKsqdN6j6evFQhaDS n2eTh9iad9A1abcl0qyAaonvTJvU70Snm499NMIsCZsw58Ng6NCQAPZRrZqjKhmK 0rQ5lfrAxBrmOCCYw9/Kei4S8CeW2HoVe0C6DwIDAQABoAAwDQYJKoZIhvcNAQEL BQADggEBAL0N7nQG5ESFvQt4c7+jgRQ2Km3ENmH/r98Z3ApRSRWby0zyGIXLqVoJ 7eMjo7f0+E3t9c9LxC6OZ2U6gC5FwraR5pCAQaa+aRk59U2rXlh8ZwYRShRoJ6AE c7WObMaWEfuFDs4c8K5CB6Wna9ui8UFJdz2JYLELPthpOe1Gk1f9snNifqfQd9p/ zNr+/wtgBZVLyJ+V257D8WBAItMnePNXPRtDEwtb960u1oz4Mhi7v00/GghzcvfY 6tJS9GJo7MdOPnOhkB0KxG6QxLiSTktLUH0PHfYyrxqYQKFPT3cIWV3P7j/4kPBI twkDfNyzXede2d8b9s7HV7k101PoUEg= -----END CERTIFICATE REQUEST----- - Navigate to and click Sign Request at the local CA in the
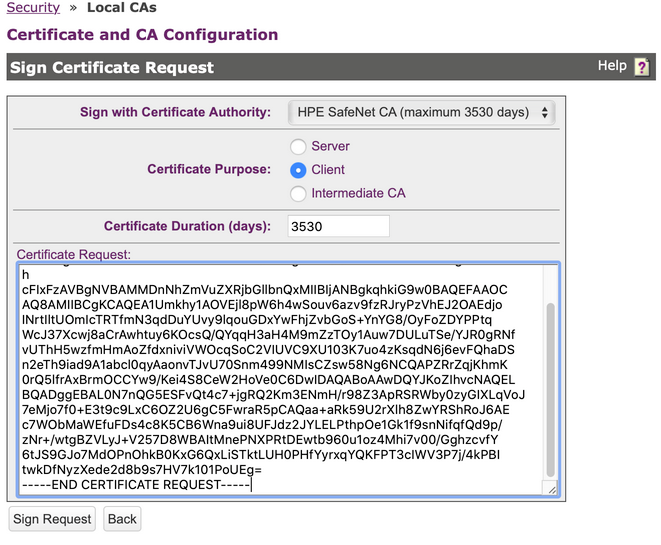
Local Certificate Authority Listlisting:- Select
Clientfrom the Certificate Purpose options. - Change the
Certificate Durationif needed. - Paste the contents of the CSR that you previously copied, from the clipboard to the Certificate Request section.
- Click Sign Request to sign the CSR.
- Select
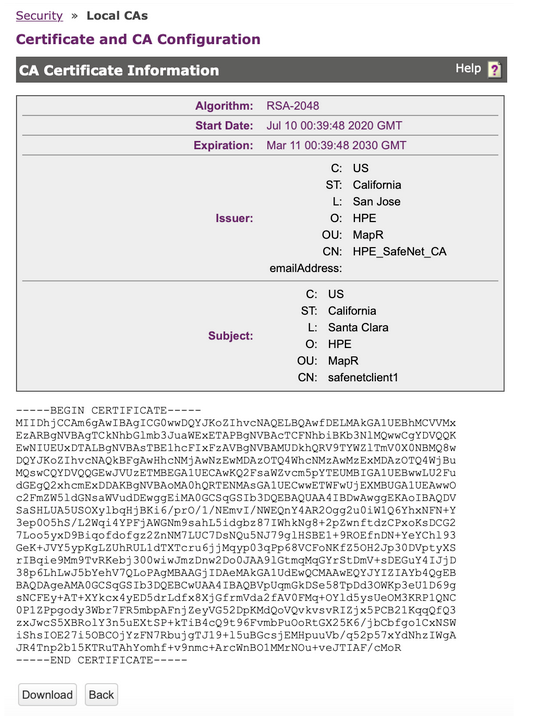
- The system then displays the signed client certificate as shown in the following example.For configuring the client certificate section of the local user, copy the contents of the signed client certificate starting with -----BEGIN CERTIFICATE----- and ending with -----END CERTIFICATE----- to your clipboard.
TIP
If you have overwritten the clipboard contents, you can obtain the signed client
certificate using the following steps:
- Navigate to .
- Click Show Signed Certs.
- In the
Signed Certificatessection, select the certificate matching the CN and other details that you configured in Step 1 from the list. In this example, the certificate issafenetclient1. - Click Properties. The Signed Certificate Information page appears.
- Copy the contents of the signed client certificate starting with -----BEGIN CERTIFICATE----- and ending with -----END CERTIFICATE----- to your clipboard.