Step 4: Create the Data Fabric KMIP Group and User for the Cluster
Describes how to create the KMIP group and user to store cluster keys on the ESKM server.
You now need to create a KMIP user/object group pair to store your keys. As KMIP keys for data-fabric are cluster-specific, you should create a different KMIP user/object group pair for each cluster so that each cluster can only access its own KMIP keys.
Create the Cluster-Specific Data Fabric KMIP Group
To create a cluster-specific KMIP group:
- Navigate to and click Add.
- Enter the name of the group in the format mapr-<cluster> where <cluster> is the cluster name.
-
In the drop-down box for the Group Type, select
KMIP. -
Click Next.
The system displays a confirmation page to create two KMIP groups:
- Click Save.
The system creates two KMIP groups. In this example, the data-fabric cluster is named
my.cluster.com. Therefore, the system creates the KMIP group pair:mapr-my.cluster.comobject group, andmapr-my.cluster.com_useruser group, as shown.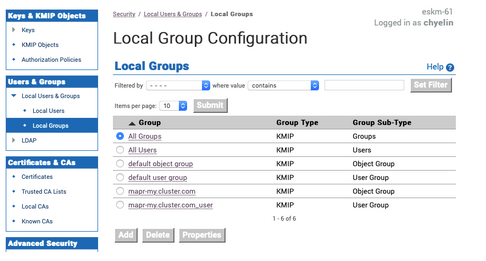
Create the Data Fabric KMIP User for the Cluster
To create the KMIP user:
-
Navigate to
and
click Add. The
Create Local Userpage appears. -
Enter the information for the local user:
-
The user name must match the CN of the client certificate. In the
example, the CN for the client certificate is
maprkmipclient1, and therefore this is also the user name. - The
User Administration PermissionandChange Password Permissionfields do not apply to KMIP groups, so leave these unchecked. - Check the
Enable KMIPoption. - Leave the
Map non-existent Object Group to x-Object Groupoption unchecked. - Set the KMIP User Group to the user group that
you created earlier. In this example, the user group is
mapr-my.cluster.com_user. - Set the KMIP Object Group to the object group
that you created earlier. In this example, the object group is
mapr-my.cluster.com. -
In the
KMIP Client Certificatefield, paste the contents of the signed client certificate that you copied to your clipboard.
-
The user name must match the CN of the client certificate. In the
example, the CN for the client certificate is
- Click Create. The system creates the KMIP user (
maprkmipclient1in this example), and returns to the Local Users listing.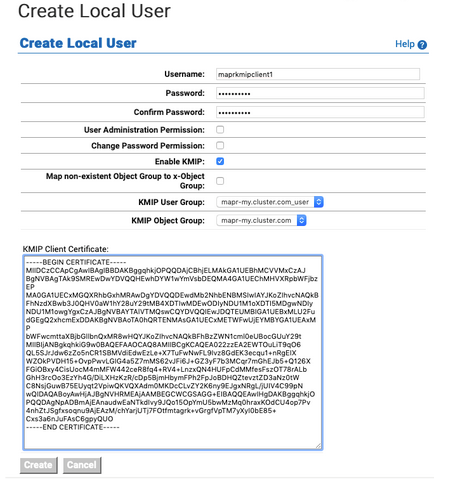
- The CA used to sign the client certificate. This is the local CA that is downloaded from the ESKM.
- The signed client certificate that was signed by the KeySecure local CA and downloaded from the ESKM.
- The client private key which was generated using OpenSSL.
Continue the setup on the data-fabric CLDB node using the configure.sh script with the HSM parameters, or the mrhsm Commands.