
Applying a Patch Manually
MapR patches are version-specific and cumulative. Each patch contains the code fixes that were included in the previous patch for that MapR version.
- For patch-download information, see Applying a Patch.
- The steps for patching the MapR Control System (MCS) are different from the steps for patching MapR Core. See Special Considerations for MCS Patches.
- You can also apply a patch using the MapR Installer. See Applying a Patch Using the MapR Installer.
- A patch for a given software version can be removed, and an older patch for the same MapR software version can be installed. However, rolling back a cluster from a newer MapR version to an older version is not supported.
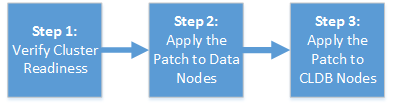
Applying a patch is a three-step process:
When you apply a patch to the cluster, the patched files along with original files
(non-patched) are copied to the /opt/mapr/.patch folder. In the
/opt/mapr/.patch folder, the file ending with .O is the
original file (non-patched) and the file ending with .<patch_number> is
the patched version. Therefore, if there is a file under
/opt/mapr/.patch/lib/, you can compare that with the corresponding file
under /opt/mapr/lib/ by using the md5sum command to verify
that the patch was successfully deployed.
If you need more information or if you encounter any problems with patch installation, contact support@mapr.com.