Configuring Remote Authentication for the Installer
This page describes how to specify a password or private key that enables the Installer program to perform common operations on all nodes in the cluster.
Installer Authentication Methods
Some Installer operations, such as installing, upgrading, or verifying services, require
the Installer to log in (authenticate) to every cluster node with
root-user
access (or sudoer access to root). The Installer lets you specify one of
the following methods to log in: - SSH Password authentication
- SSH Private key authentication
Using the SSH Password Login Method
The SSH Password login method is the default method. To use this method:
- In the Login Method field of the Configure Remote
Authentication section, select SSH – Password as
the login method:
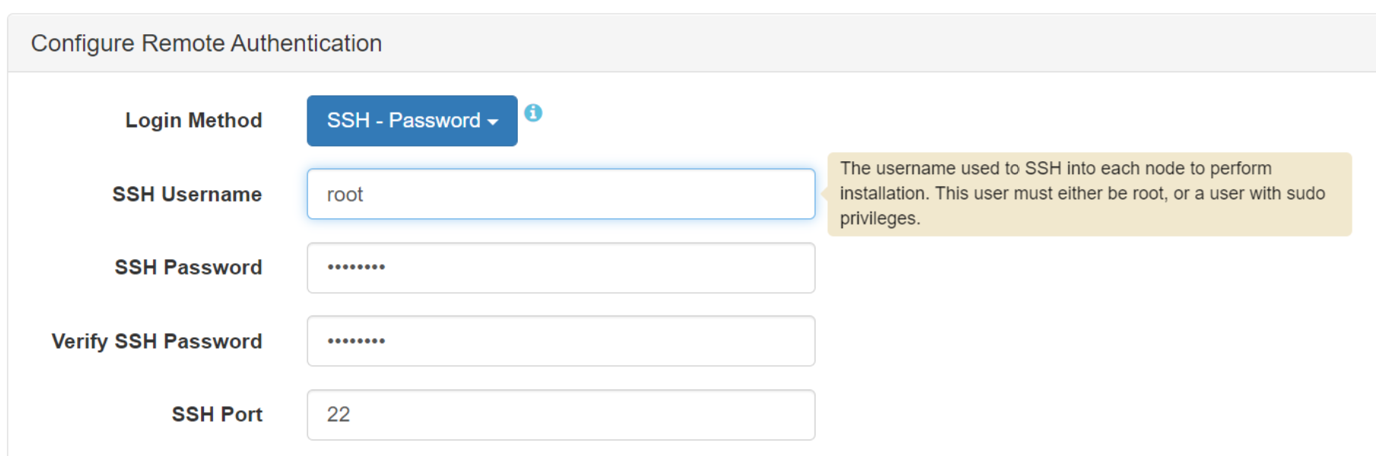
- In the SSH Username field, specify
rootor a user with sudo privileges. The user must exist and have the same password on every node in the cluster. - If you plan to perform the installation with an ssh ID of
root, go to step 4. If you plan to perform the installation with an ssh ID other thanroot, follow the instructions in If You Specify a User Other Than root. Then continue to step 4. - Enter the SSH Password for the ssh user, and re-enter the password to verify it.
- In the SSH Port field, specify a port number if your installation uses an ssh port other than the default port (22).
- Click Next to advance through the remaining Installer screens.
If You Specify a User Other Than root
Specifying a user other than root for remote authentication requires an
extra step. This step must be performed before you advance through the remaining Installer
screens.
On every node in the cluster, create a file named
<your_login_ID> in
the /etc/sudoers.d directory. It doesn't matter what the file is named as
long as the file is unique in the directory. Typically, the file takes the name of your
logon ID. The file must contain the following
entry:<your_login_ID> ALL=(ALL) NOPASSWD: ALL
Defaults: <your_login_ID> !requirettyroot.Using the SSH Private Key Login Method
If you decide not to use the SSH Password method, you can use the SSH Private Key login
method. The private key method is more secure because:
- You do not need to provide a password to the Installer.
- Authentication is performed using an encrypted private key.
The private key method requires certain configuration steps to be performed before you run the Installer.
Before using the Installer:
- If you already have an ssh key pair for the login user, go to step 3.
- If you don’t already have an ssh key pair for the login user, use any node to generate
a key pair that can be distributed to all the other nodes. Use a utility such as
ssh-keygento create the ssh key pair. For example, while logged on asrootor a user that has sudo access toroot, run this command:
The utility creates a private key namedssh-keygen -t rsa -N "" -f ~/.ssh/<filename><filename>and a public key named<filename>.puband stores the files in~/.ssh, where~refers to the user’s home directory. Here is an example of thessh-keygencommand:ssh-keygen -t rsa -N "" -f ~/.ssh/mykey Generating public/private rsa key pair. Your identification has been saved in /home/user/.ssh/mykey Your public key has been saved in /home/user/.ssh/mykey.pub The key fingerprint is: SHA256:Sg+nEojf/3idE0pCdUATwzffAvOD8WKcD9BwaYIO2TE user@install_node The key's randomart image is: +---[RSA 3072]----+ | oE=B=.. | | o o.=+@ | | o . B @ . | | . . o B * . | |. . ..o S. + o | | . . o.*. . . | | . o oo.o o | | o .o + | | oo. . | +----[SHA256]-----+ user@install_node:~$ cd .ssh user@install_node:~/.ssh$ ls known_hosts mykey mykey.pub - On the node, where you created the key pair, check the permissions and ownership of
both the public- and private-key files. HPE recommends that the login user owns the
private-key and public-key files. The private key should be read/writable only by the
login user and have a permission of 600. The public key should be read/writable by the
login user but also world-readable and have a permission of
644:
cd ~/.ssh chmod 600 mykey chmod 644 mykey.pub - Copy the public-key file (
<filename>.pub) to every node in the cluster. As you copy the public-key file to each node, ensure that the file retains the same permissions and ownership described in step 3. - Create and distribute the authorization file:
- On any node, create an authorization file named
authorized_keys(unless the file already exists). The authorization file will contain the content of the public-key file. When you create the authorization file, make sure that the file has a permission of 600, and the login user owns the file. - Append the public-key information to the authorization file by using a command
such as the
following:
cat <filename>.pub >> ~/.ssh/authorized_keys - Copy the authorization file to every node as
~/.ssh/authorized_keys, where~refers to the user's home directory. Note that if any nodes already have an authorization file, do not overwrite the file. In that case, repeat step 5b to append the public-key information to the authorization file. Or use the command described in the following note to append the information.
NOTE With newer versions of OpenSSH, it is possible to combine steps 3, 4, and 5 into a single command that:- Uses ssh to securely copy the public key file.
- Creates a file in
~/.ssh/authorized_keysby default and appends the public key to that file. - Sets the default permission (
chmod 600) on the~/.ssh/authorized_keysfile.
But this command has not been tested on all distributions.ssh-copy-id -i ~ssh/mykey.pub user@node1 - On any node, create an authorization file named
- Copy the private key file to the workstation where you will use a browser to run the Installer. The file must be present on the workstation so that when you click the Browse button in the Installer Private Key field, you can browse to and select the file.
- If you plan to perform the installation with an ssh ID of
root, go to step 8. If you plan to perform the installation with an ssh ID other thanroot, follow the instructions in If You Specify a User Other Than root. Then continue with step 8. - Verify that you can use ssh and the key pair to access all the nodes without being
asked for a password.
- For example, execute this command from the Installer
node:
Running the command should enable you to log in to the node and display a prompt (without requiring a pasword) if these conditions are true:ssh -i ~/.ssh/private_key <nodename>- The Installer node has the private and public key files in
~/.ssh. - The
openssh_serveris installed and running on each cluster node.
If you are prompted for a password, check the file permissions. If ssh access does not work for a node, the Installer will return an error when it tries to authenticate to the node.
- The Installer node has the private and public key files in
- Also, when you check access to each node, make sure that you can successfully run
a command that requires
rootaccess without being asked for a password. For example:ssh -t <nodename> "sudo ls /root"
- For example, execute this command from the Installer
node:
When you run the Installer:
- In the Login Method field of the Configure Remote Authentication section, select SSH – Private key as the login method:
- In the SSH Username field, specify
rootor a login user with sudo privileges. The user must exist and have the same password on every node in the cluster.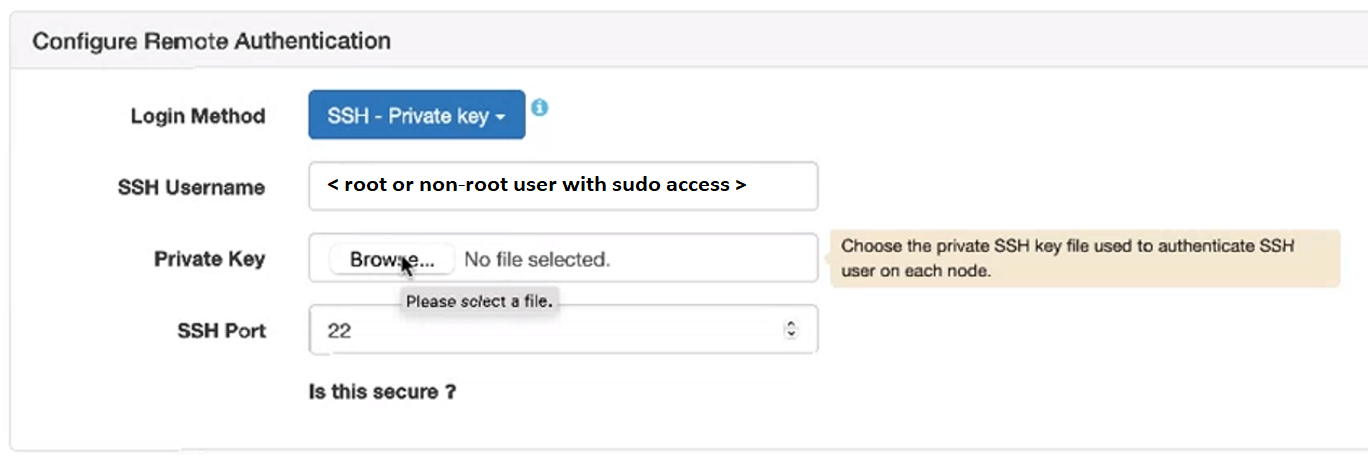
Specifying a non-rootuser for the SSH Username requires the creation of a file in the/etc/sudoers.ddirectory, as described If You Specify a User Other Than root. - In the Private Key field, browse to select the private ssh key file that can authenticate the ssh user on all nodes.
- In the SSH Port field, specify a port number if your installation uses an ssh port other than the default port (22).
- Click Next to advance through the remaining Installer screens.