Using Custom Playbooks
Installer 1.12.0.0 and later enable you to use custom playbooks that can run a set of predefined tasks during or after operations using the MapR Installer or MapR Installer Stanzas.
Using custom playbooks, you can inject specific commands into the Installer 1.12.0.0 and later workflows to make configuration changes and ensure that those changes persist even after incremental installations or upgrades. For example, suppose you want to install a specific software package on all nodes before starting an installation. Custom playbooks enable you to check for and install the software as needed.
Or suppose you want to change a configuration setting before starting MapR Core. Custom playbooks enable you to change the setting as part of an installation or upgrade.
Restrictions to Using Custom Playbooks
- You can use custom playbooks with any MapR cluster as long as the MapR Installer version is 1.12.0.0 or later. However, MapR Installer 1.12.0.0 and later have limited functionality when used with older MapR releases. See Selecting an Installer Version to Use.
- Custom playbooks are not supported for manual installations. Custom playbooks are supported only for use with the MapR Installer and MapR Installer Stanzas.
Prerequisite for Using Custom Playbooks
mapr-setup.sh. To begin
learning Ansible, see these resources:Creating and Running a Custom Playbook
| No. | Step | See for more information |
|---|---|---|
| 1. | Prepare the roles structure and YAML files for the custom playbook. | |
| 2. | Test the roles using standalone Ansible. | |
| 3. | Convert the YAML files to a zipped archive file that has a tgz
or tar.gz file extension. |
|
| 4. | In the MapR Installer or a MapR Installer Stanza, specify the option to upload the zipped archive file. | |
| 5. | Run the MapR Installer or MapR Installer Stanza to invoke the playbook. | |
| 6. | If the operation returns a syntax error, fix the error and retry the operation. |
Predefined Roles for Custom Playbooks
The role structure is an important part of your custom playbook. Your custom playbook must contain one or more of the following roles, and each role must be a directory in the zipped archive. The roles do not need to follow a specific order.
| Role | Tasks in this role are run after . . . |
|---|---|
| preinstall | The MapR Installer has verified the nodes but before the installation workflow has begun |
| postecoreconfigure | configure.sh has run for MapR Core but
before MapR Core has been started |
| postecoconfigure | Ecosystem components are configured and started |
| postinstall | The cluster is completely installed and running (at the end of the Installer Stage2 playbook) |
preinstall
   tasks
      main.yml
postcoreconfigure
   tasks
      main.yml
   vars
      main.yml
The uploaded tarball must contain relative path names with just the top-level role directories, and the tarball structure must adhere to the Ansible role-structure rules. If you need to configure your own roles in the tarball, you must include them as sub-roles to be run from within the pre-defined roles. For more information, see Ansible Roles.
Example Playbook Files
preinstall/tasks/main.yml
file:---
- name: Install misc stuff - Midnight commander
vars:
packages_Suse: ['mc']
packages_RedHat: ['mc', 'lsof']
# syslinux-utils is for gethostip, libpython is required for collectd
packages_Debian: ['mc']
package: name={{ item }} state=present
with_items: "{{ vars['packages_' + ansible_os_family] }}"
The following example shows the postcoreconfigure/tasks/main.yml file for
the previous role structure. This example sets the number of RPC threads in
mfs.conf from the current setting to 4 threads. The variable used to
point to the file is defined in postcoreconfigure/vars/main.yml:
---
- debug: var=mapr_home

- name: Bump MFS RPC threads
  lineinfile:
    path: "{{ mapr_conf_dir }}/mfs.conf"
    regexp: '^(?P<threads>mfs.numrpcthreads=).*$'
    line: '\g<threads>4'
    backrefs: yes
postcoreconfigure/vars/main.yml):---
mapr_conf_dir: "{{ mapr_home }}/conf"
Testing the Roles
Before uploading your zipped archive, develop and test your role files outside the installer using the standalone Ansible 2.7 debugger. You cannot use the Ansible debugger from within the MapR Installer. For more information, see Playbook Debugger.
Testing the roles by running them using the MapR Installer can be time-consuming. If a role contains logic errors, these errors won't be visible until the playbook is initiated. For example, a postinstall playbook that you run during a new installation does not generate an error until the installation is completed. A new installation can take 20 minutes or more, depending on the cluster size. Therefore, you can avoid having to re-run the Installer and playbook by testing the roles for logic errors before using them.
virt_runner program in the/opt/mapr/installer/bin/
directory. Use this
command:virt_runner ansible-playbook -i, -k <Playbook-file-name>When you run the playbook in this fashion, you do not have access to the variables (for
example, mapr_home) that the Installer defines. So you must set those up
manually.
Creating the Zipped Archive
To create the zipped archive, you can use a tool such as 7-Zip or Linux
commands. The following example uses the Linux tar command to create an
archive of the directory structure and the gzip command to zip the
archive.
tar command, change the directory to the directory in
which you created the role structure. For example, if you created the role structure in the
/tmp directory, you must issue the tar command from the
/tmp
directory:tar -cvf /tmp/custom_pbs.tar .
./
./preinstall/
./preinstall/tasks/
./preinstall/tasks/main.yml
./postcoreconfigure/
./postcoreconfigure/tasks/
./postcoreconfigure/tasks/main.yml
./postcoreconfigure/vars/
./postcoreconfigure/vars/main.yml
gzip /tmp/custom_pbs.tar
The gzip command creates a custom_pbs.tar.gz file in the
/tmp directory. If you are using the MapR
Installer, move the zipped file to the node hosting your browser so that you can upload
it using the MapR Installer upload option.
Installer Options for Custom Playbooks
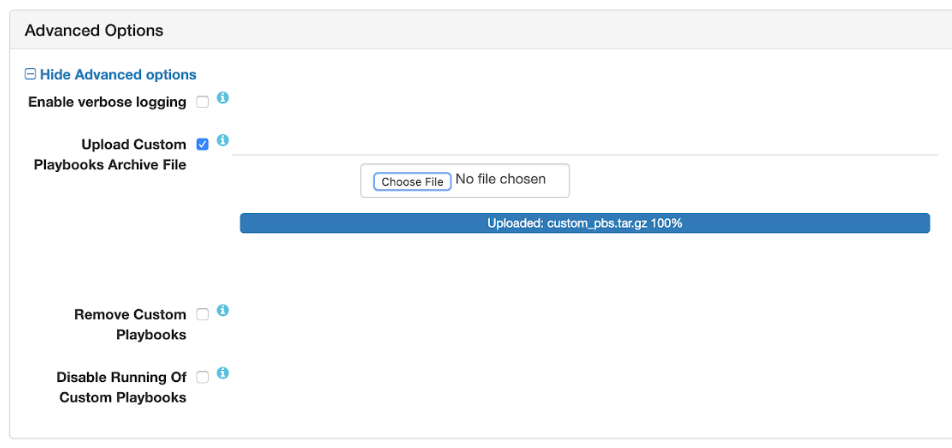
To use the options, you select an option and then advance through the Installer menus to complete the Installer task. You can access these options from the following MapR Installer tasks:
- Install
- Incremental Install
- Upgrade Version
- Maintenance Update
Whichever option you select, the Installer obeys the option every time you use the Installer for any operation. Therefore, if you select the option to upload a custom playbook, the Installer will run the playbook every time you use the Installer. If you select the option to disable playbooks, playbooks will be disabled until you select a different option. If a value has been set by a custom playbook and you run the same playbook again, the value is left unchanged.
| Option | Description |
|---|---|
| Upload Custom Playbooks Archive File | Uploads a zipped TAR file for your custom playbook to
/opt/mapr/installer/data/tmp/custom_playbooks/. The Installer
displays the file name of the uploaded archive. An error is displayed if you upload a
file that does not have a tgz or tar.gz file
extension.The Installer allows you to upload one playbook at a time. If you upload a new playbook when another playbook is already loaded, the previously loaded playbook and its archive are removed, and the new playbook is loaded. |
| Remove Custom Playbooks | Removes the installed custom playbook and its archive from
/opt/mapr/installer/data/tmp/custom_playbooks/. Both the playbook and
the directory structure are removed. |
| Disable Running of Custom Playbooks | Enables you to run the MapR Installer or MapR Installer Stanzas without executing the uploaded custom playbook. |
MapR Installer Stanza Parameters for Custom Playbooks
To upload a custom playbook using a Stanza, specify the cpbs_location
parameter followed by the path to the playbook in quotations. For example:
environment:
  mapr_core_version:6.1.0
  #DOC path to tar.gz archive of custom playbooks to be installed
  #DOC to remove the custom playbooks, provide an empty string
  #DOC for the filename, or remove cpbs_location all together
  cpbs_location: "/tmp/custom_plays.tar.gz"
To remove a custom playbook using a Stanza, specify an empty string for the file name:
environment:
  cpbs_location: ""
  ...
Or remove cpbs_location from the environment section.
To disable a custom playbook without removing it, set the
custom_pbs_disable parameter to true
config:
  #DOC flag to indicate if you want to skip running of installed custom playbooks
  custom_pbs_disable: true
Troubleshooting Custom Playbook Errors
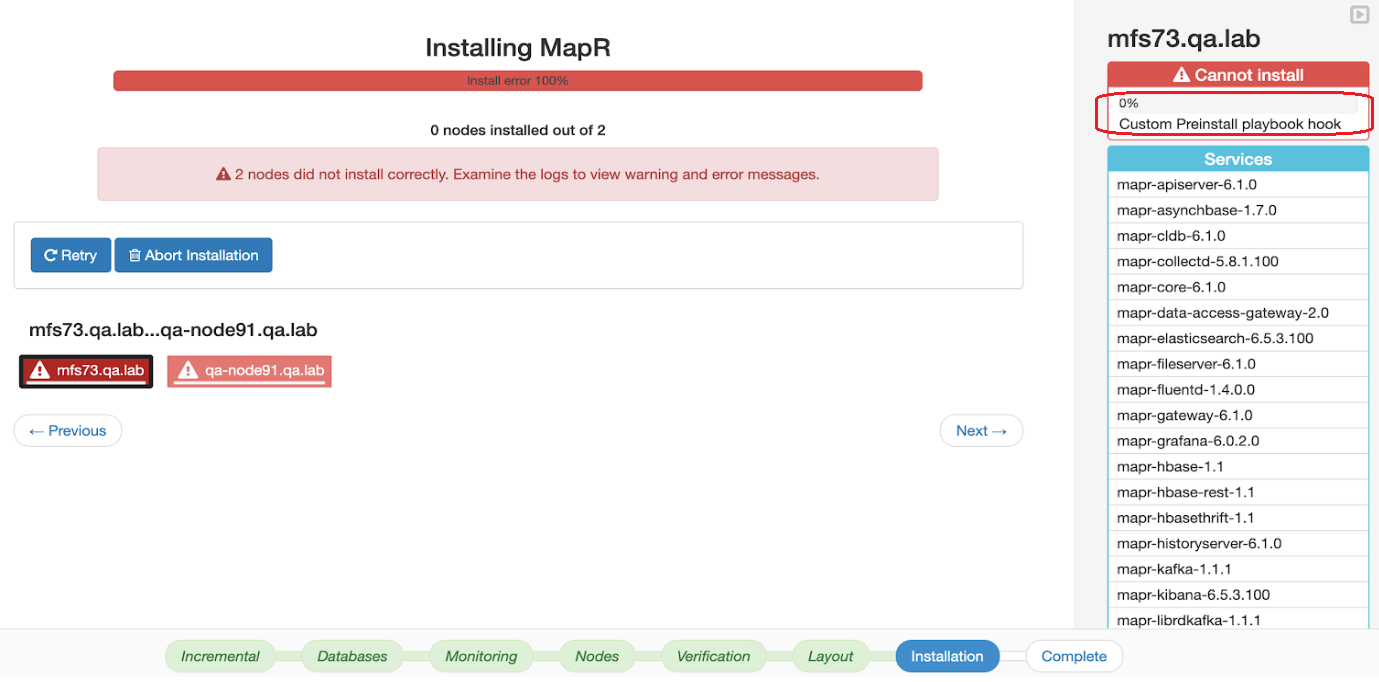
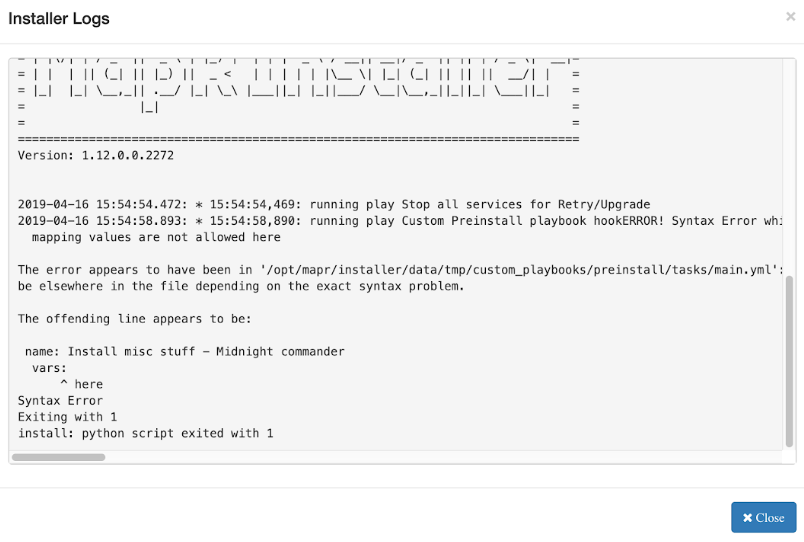
(Clicking the node log provides limited information for syntax errors.) For more information about the MapR Installer logs, see Logs for the MapR Installer.
Using the Retry Button
You have several options for fixing the issue. You can fix any problems by logging on to
the Installer node and making changes directly in the playbook files located at
/opt/mapr/installer/data/custom_playbooks. Then click the
Retry button in the MapR Installer GUI
interface. If you use this method, note that you must eventually propagate any fixes to your
original tarball if you want to reuse the tarball.
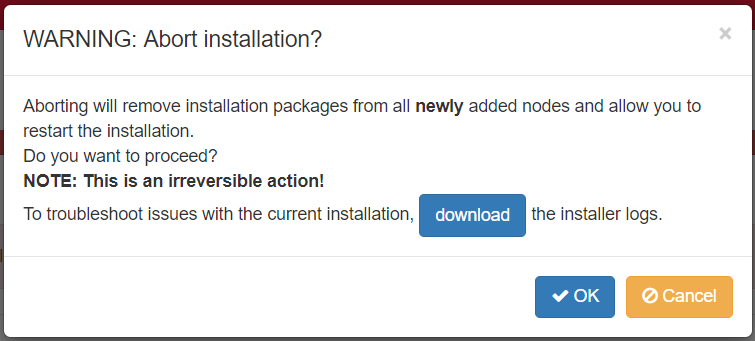
Using the Abort Installation Button
Another option is to abort the installation and repeat the operation after fixing the error and uploading a corrected playbook. Before using this option, it is important to know that using Abort Installation does not remove changes made to the Installer database during the operation that you aborted. After an abort, the Installer can display the desired state rather than the actual state of the nodes.
For example, if you attempted to upgrade a EEP from EEP 6.1.0 to EEP 6.2.0 and then aborted the operation, the MapR Installer can display the currently installed EEP as EEP 6.2.0 even though EEP 6.2.0 has not been installed on the cluster nodes. This condition persists until you rerun the upgrade operation successfully or revert to the last known cluster state by using Support > Import State. See Importing or Exporting the Cluster State.
Click OK to return to the Installer home page. Fix the playbook error and retry the operation.