Deploying a Cluster in Azure Using the MapR Marketplace Offering
Explains how to deploy a cluster in Azure using the Marketplace Offering.
About this task
Select the Offering
Procedure
- Navigate to the MapR page in the Azure Marketplace. For more information, see MapR Offerings in the Azure Marketplace.
- Select MapR Converged Data Platform v6.
- Click Create.
Configure Basic Settings
Procedure
-
In the Admin username field, enter the user name for
the cluster administrator (for example,
admin_mapr). This is an operating-system account that will be created on all nodes in the cluster. - In the Authentication type field, select Password or SSH public key.
-
In the Admin password field, enter the password for
the Admin user. The password must be between 12 and 72 characters long and
must have three of the following:
- One lower case character
- One upper case character
- One number
- One special character that is not "\" or "-".
NOTE For cloud deployments, the installer uses the Cluster Admin Password as the MySQL root password when it creates a MySQL database for certain services that require a database. - Reenter the Admin password.
- In the Subscription field, enter the subscription option that is appropriate for your installation.
-
In the Resource group field, either select the
option to create a new resource group and give it a name, or select the
option to use an existing group. The examples in this procedure use
myRGas the resource group name. - In the Location field, select your region.
- Click OK.
Configure the MapR Cluster Configuration
Procedure
-
In the MapR cluster name field, enter a name for the
cluster. Give your cluster a DNS-friendly name, such as
my.cluster.com. The name should be unique across all of your clusters. -
In the Cluster admin password field, enter the
password for the UID
mapr. The password must be between 6 and 30 characters, and must include at least one uppercase letter, one lowercase letter, and one numeric digit.NOTE The UIDmapris not the same account as the Admin user account that you created in step 1 of Configure Basic Settings. The Admin user account is used for MapR software installation and can be used subsequently for SSH access and server administration. The UIDmapris the MapR administrator account, which is an additional OS account that is created on each node in the cluster and acts as the MapR system user. - Confirm the password.
- In the EEP version field, ensure that the Ezmeral Ecosystem Pack (EEP) version is selected.
- In the License type field, select either the Enterprise or Community
- In the Provisioning template field, select the auto-provisioning template. For more information, see Auto-Provisioning Templates.
- In the Node count field, enter the number of nodes.
- Click OK.
Complete the Node Configuration
Procedure
- In the Virtual Machine Size menu, select a VM size, first clicking View all if you need to see the supported machines for the selected region.
- In the Disk count field, enter the number of disks.
- In the Disk type field, select between SSD and HDD disks.
- In the Disk size field, enter the disk size in gigabytes.
- Click OK.
Configure Global Access and Security
Procedure
- In the Virtual network field, create a new virtual network or choose an existing one.
-
Complete the Subnets values as needed:
- Private subnet name
- Private subnet address prefix
- Public subnet name
- Public subnet address prefix
- In the Public internet access CIDR field, enter the public Internet access CIDR, or use * for all Internet traffic. This field enables you to set or restrict the outside Internet IP addresses that can access the cluster.
- In the Install OpenVPN field, select True if you want to install OpenVPN. For more information about using OpenVPN to access this MapR cluster, see Using OpenVPN.
- In the OpenVPN login user field, specify a user name for OpenVPN.
- In the OpenVPN login user password field, specify a password for OpenVPN. The password must be at least 6 characters, no more than 30 characters, and must include at least one upper case letter, one lower case letter, and one numeric digit.
- Confirm the password.
- In the Disk type field, select SSD or HDD as the disk type.
- Click OK.
Complete the Summary Information and Purchase
Procedure
- Review the summary information and, if necessary, navigate back through the menus to make corrections or updates.
- Click OK.
- On the Create screen, review your contact information and then click Create.
Gain Access to the Cluster
Procedure
- Navigate to the Resource groups menu.
-
Click the link for your resource group (for example,
myRG) to monitor the creation of resources. -
Once the cluster is deployed, you can access it through a collection of
URLs provided by the MapR Installer. These URLs
may require a VPN connection, and you may need to use a tool such as OpenVPN
to connect to the virtual machine. For more information, see Using OpenVPN.
If you did not choose to install OpenVPN in step 4 of Configure Global Access and Security, you must use another method or tool to connect to the virtual machine.
-
Once you are connected, use the MAPRINSTALLERURL to
access the status page of the MapR Installer. To
locate the MAPRINSTALLERURL, navigate to
Resource Groups > myRG > Deployments, and click
the cluster deployment name. For example:
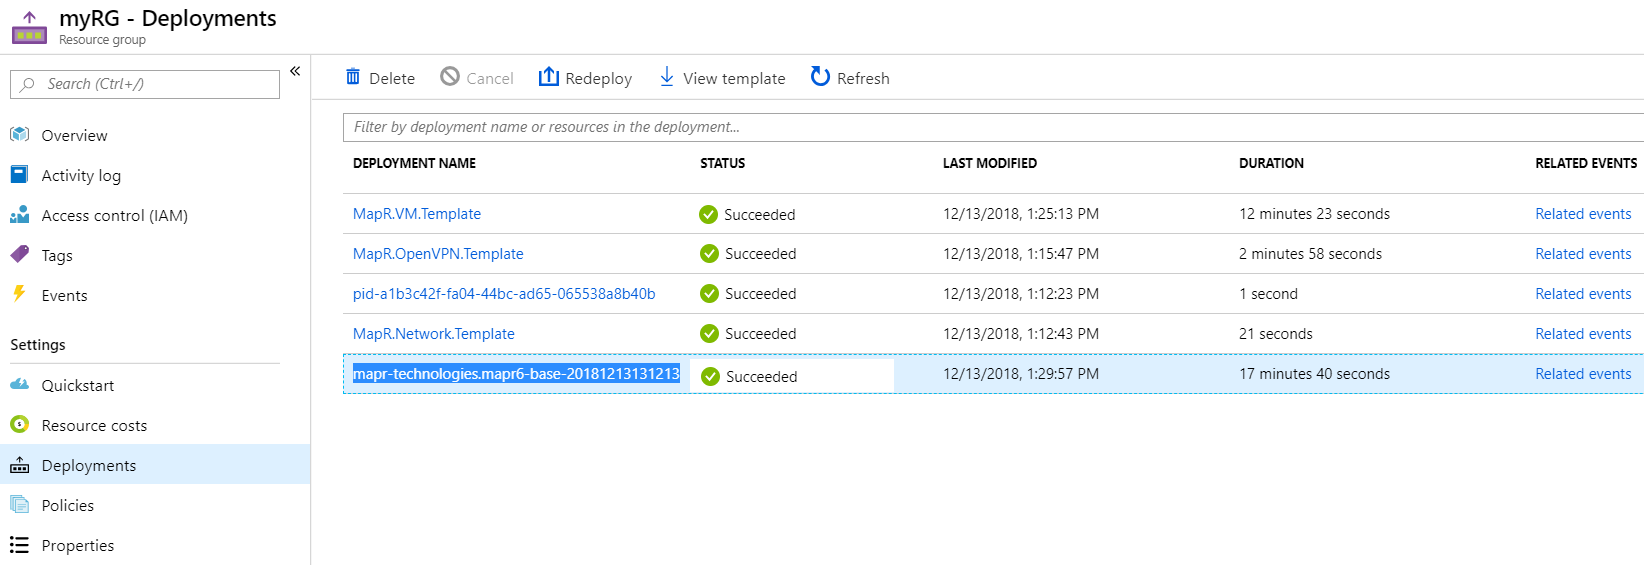
The Overview page appears.
-
Click the Outputs tab to display the
MAPRINSTALLERURL information.

-
Paste the MAPRINSTALLERURL into a browser to access
the status page of the MapR Installer, which shows
links to resources you can use to get more information about the cluster:
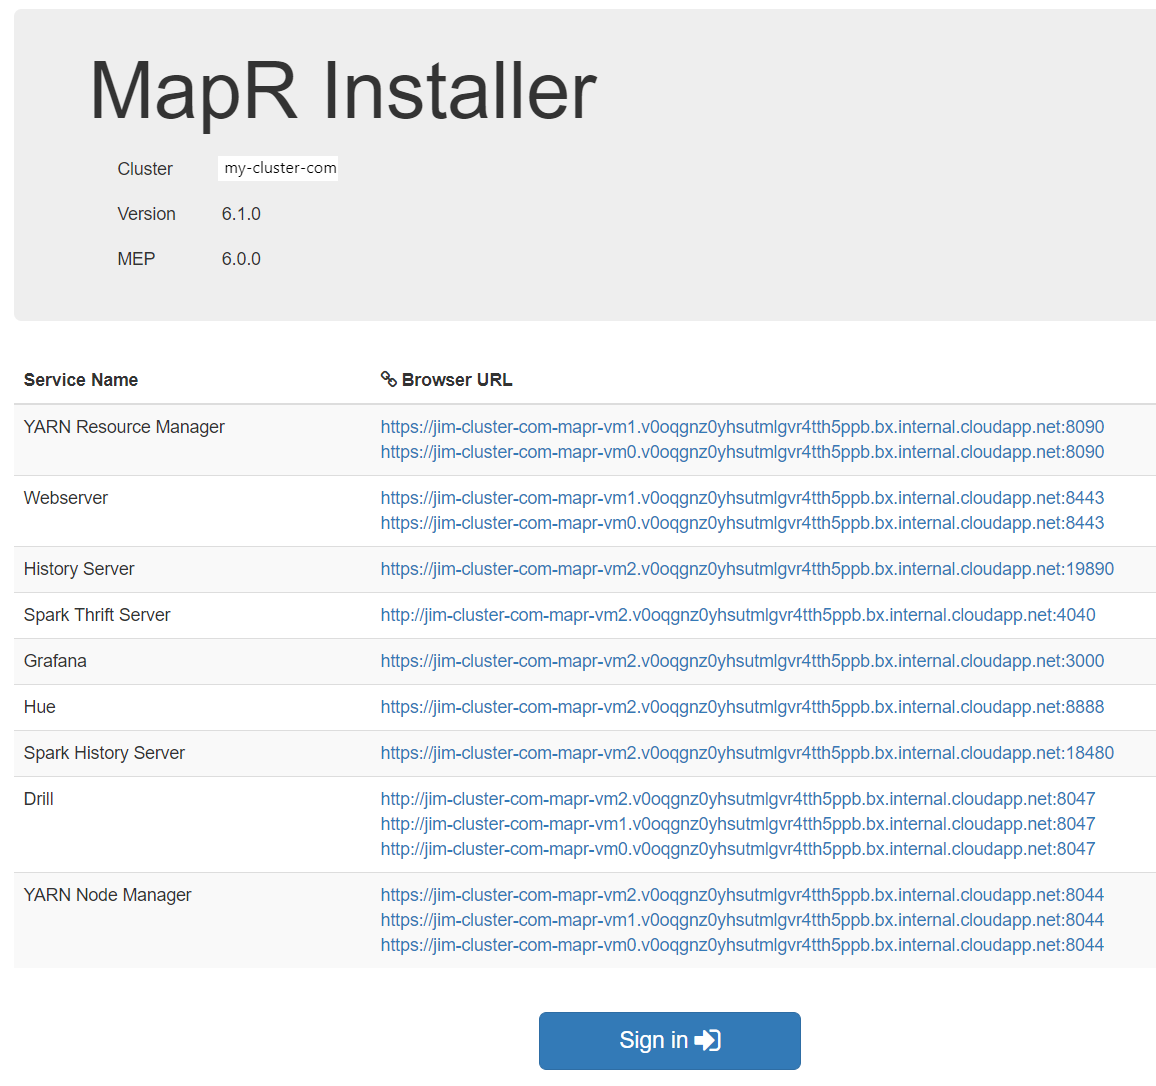
-
To log in to the Control System, click one of the
Webserver links, using the password you specified
for the UID
maprin Configure the MapR Cluster Configuration.